Setting up Apache Spark and Zeppelin
This article describes how to setup Spark and Zeppelin either on your own machine or on a server or cloud. Spark and Zeppelin are big software products with a wide variety of plugins, interpreters, etc. Finding the compatible versions, Dockerfiles, configs, etc. for a simple setup can be daunting. This here might help you to deploy and play around with Spark on your local machine or create a server setup as a ground to do some demos or proof of concepts. In this setup we will use the local file system and not a distributed one. When you use Spark in a production grade setup, you want to scale your filesystem and workers. But, our goal here is to create a playground environment.
This blog post refers to this accompanying GitHub repository:
sebastianhaeni/spark-zeppelin-docker
What is Spark and Zeppelin
Apache Spark is an engine to process your data in a highly parallel and fault tolerant way. You can submit programs as Spark jobs which will be run on Spark cluster consisting of at least one worker node connecting to a distributed storage. The programs can be written most famously in Python (PySpark) or Scala using the MapReduce paradigm. Alternatively, you can use Spark SQL to submit SQL queries and retrieve the query result. However, the user interface of the Spark master and worker nodes merely display running jobs and logs. There is no user interface to submit jobs. This calls for a Notebook solution.
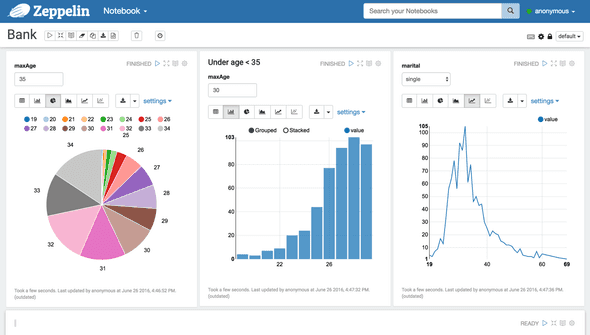
Apache Zeppelin is a notebook web application like JupyterLab focusing on notebook collaboration. Both tools cover a similar feature set. There are many opinions out there on which tool is better. Please make your own opinion about it. This article just covers how to install it. Zeppelin fits quite nicely into the Spark world, but you can achieve the same results using JupyterLab.

Image Source: zeppelin.apache.org
Setup
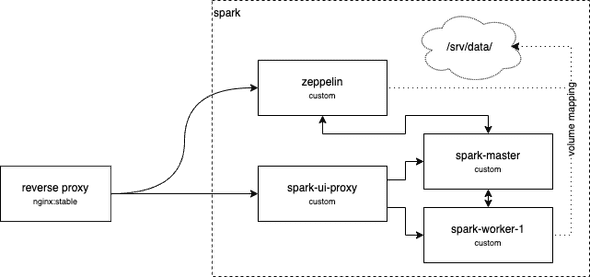
This diagram shows all the Docker containers we will setup:

Instructions
Note: You need to configure Docker to have at least 4 GB of memory.
- Clone this repo
git clone https://github.com/sebastianhaeni/spark-zeppelin-docker.git - Build the base image
docker build -f Dockerfile_base -t registry.local:5000/spark-zeppelin-demo/spark_base:latest . - Build the remaining images
docker compose build - Append the following to your
/etc/hosts(Linux & MacOS) /C:\Windows\System32\drivers\etc\hosts(Windows) file127.0.0.1 zeppelin.local 127.0.0.1 spark-ui-proxy.local - Run with
docker compose up - Open http://zeppelin.local/ in your browser to access Zeppelin
- Open http://spark-ui-proxy.local/ in your browser to access Spark
And there you go. An example notebook is included as well to get you going.
Reverse Proxy
The reverse proxy allows us to proxy to an internal container by server name. So, we don’t have to map ports from the internal Docker network and we don’t have to remember names.
To make this possible, we also need a custom Python web server that transforms the responses from Spark-Master and Spark-Worker.
They do not support reverse proxies out of the box (no support for X-Forwarded-For etc.), thus we rewrite the <a> links to
the correct URLs.
Spark and Zeppelin
Base Image
The Spark and Zeppelin images both depend on a base image, that we have to build beforehand.
This image contains:
- JDK
- Scala
- Anaconda & Python
- Apache Spark
- Apache Zeppelin
The reason why we create a single image with both Spark and Zeppelin, is that Spark needs some JARs from Zeppelin (namely the spark interpreter jar) and Zeppelin needs some Spark JARs to connect to it. Also, Spark needs Anaconda (Python) to run PySpark. Zeppelin has a pure Python interpreter that also needs Anaconda (to be able to achieve something meaningful).
If you need to add another Python package to the image, you can do so either with conda install
or pip install at the end of Dockerfile_base. Please be sure to rebuild the images
after doing so.
Apache Spark
The current configuration will create the following 3 containers:
- spark-master: Spark Master Node where workers connect
- spark-worker-1: A worker node, connecting to the master. Could be scaled.
- Please note that the amount of CPU cores and memory to be reserved by the worker are defined in
Dockerfile_workerand can be optionally overwritten by environment variables.
- Please note that the amount of CPU cores and memory to be reserved by the worker are defined in
- spark-ui-proxy: To access the nodes’ web UI, we need to transform the content with correct URLs (they don’t properly support reverse proxies)
Please note that the Spark nodes have a volume mapping to ./data . This is where you can place files to read in your Zeppelin notebook.
An example file is already provided.
%pyspark
df = spark.read.json("/srv/data/example/people.json")
Apache Zeppelin
Zeppelin will be connected to the Spark Master (Spark Interpreter) once you run the first Spark cell in a notebook.
Compatibility Issues
Please note that Spark, Zeppelin, Python, JDK, Scala have to be compatible to each other. In the current setup, these have been tested and matched to each other. For example, this would not work:
- Upgrade from JDK 1.8 to e.g. 11. You will run into some class not found issues when running Zeppelin.
- Upgrade from Python 3.7 to Python 3.8. You will notice weird errors when running a PySpark script.
So if there’s a need to upgrade, please reserve enough time to test the compatibility between those systems well enough.
A good approach can be a test notebook in Zeppelin containing blocks with Scala, Python, PySpark and SQL interpreters. Run them all successfully, and you basically proved that the system works.